如何用调整曲线增强黑白照片

上周我们向您展示了如何将彩色照片转换为黑白照片。虽然我们与您分享的技巧和窍门产生了惊人的效果,但本周我们将再次强调一些强大的技术,以将您的图像提升到下一个层次。
我为什么要这么做?
如果你是一个新的逆向工程现代数码相机照片成黑白的,我们建议检查一下以前的教程,如何将您的彩色照片转换成惊人的黑白打印,首先。在该教程的简介中,我们将介绍使用高级照片编辑技术来创建优秀黑白照片的主要动机。
通过以下更先进的技巧,我们已经为本教程的电池一起,然而,你将能够采取你的黑白照片到下一个层次。你可能不会把你拍的每一张照片都编辑到这种程度,但是对于那些你真的想在挂在墙上之前进行按摩、操作或增强的照片,这些技术可以为图像添加恰到好处的弹出效果。
我需要什么?

就像我们之前的照片教程一样,您需要两个基本的东西:
- 要编辑的照片
- Adobe Photoshop
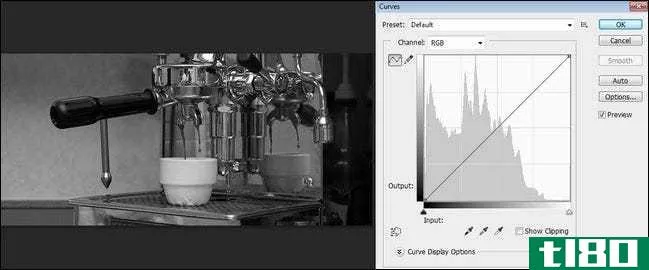
- We’ll be using a copy of Adobe Photoshop CS6, but the techniques outlined in today’s tutorial should work just fine in previous editi*** of Photoshop, as the tools we’re using have been included in Photoshop for years. For today’s tutorial, we’ll be using a simple photo we snapped of our morning espresso splashing down into the cup. It’s no sweeping view of Yosemite National Park, we know, but we like using low-key photos to showcase techniques because it puts more of a focus on the subtle changes of the technique itself. We’re going to pick up where we left off in our previous photo tutorial. You have a photo you want to edit, you already converted it to black and white using one of the effective techniques we outlined, and now you’re ready to do some more tweaking.We took our base image, seen above, and used the default filter in the Black & White adjustment menu to create a fairly neutral black and white base image. We’ll build on that below.
What Are Curves and How Can I Take Advantage of Them?
Curves are possibly the most underused tool in the Photoshop arsenal, and they’re the heart of our tutorial today. Many people are put off of using them because they are not particularly intuitive and there are so many other tools available which are a bit easier to grasp out of the gate.
Unlike Levels, where the adjustments you make are applied uniformly across the image, the Curves are applied more granularly, which makes it much easier for you, the editor, to make very subtle changes to the image. If you want deeper shadows, brighter whites, or to isolate a particular shade of blue (now gray) in the sky framed in your photo, for example, you can do so with the Curves tool.
In the image above, you can see both the base photo and the unadjusted Curves readout of the image. Notice how the line from the lower left to the upper right is a nice clean, straight, diagonal line; our Curves, in other words, are pretty flat. The curves can seem a bit abstract, so let’s pick a spot on our photo and see where it falls on the curve. We’re going to click on the white side of the cup to sample that spot. Note: If you just click a spot and hold it, it will show you the spot on the curve, but if you hold CTRL and click it then there will be a permanent mark on the curve line:
Now, let’s look at that little black dot on that curve. Follow it with your eyes to the left gradient bar, and then follow it with your eyes down to the bottom gradient bar. That dot represents the slightly gray, almost white, value of the cup in the photo.
Because the curve is unadjusted, the input (the lower gradient bar) matches the output (the left-hand gradient bar). If we were to grab that little marker on the curve and pull it down it would darken the value, and if were to raise it then it would lighten the value. Let’s take a look at what happens when we do that in the next section of the tutorial.
Adjusting Your Image via Manual Curve Manipulation
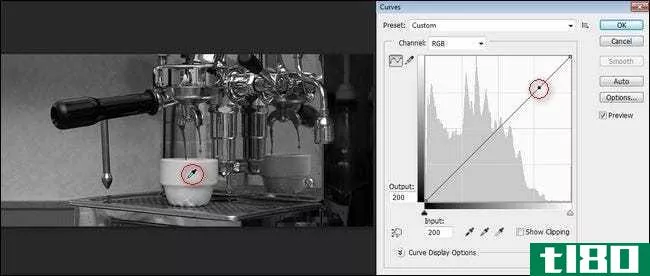
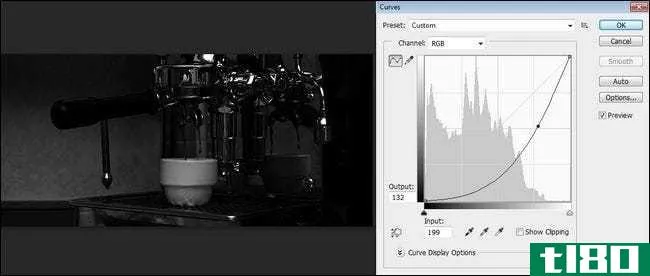
The values for that particular tone as well as the entire curve have been changed. The previously slightly gray cup is now shockingly white and the highlights on the chrome of the espresso machine are much brighter (as is the rest of the image). There are some nice subtle changes to the image, such as in the reflecti***, and the shape of the Bakelite handle of the espresso portafilter is significantly better defined against the background now. It’s not a bad looking little image, and it’s a lot more visually interesting now than it was before.
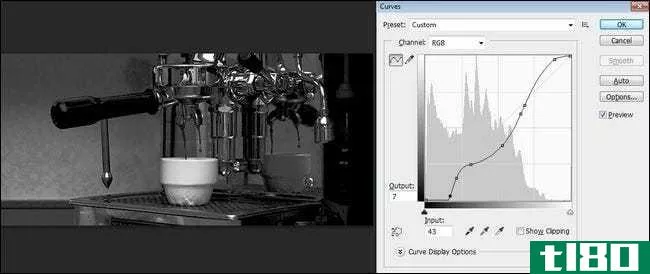
What if we went the opposite route, though? What if we dropped the value way down instead of spiking it way up?
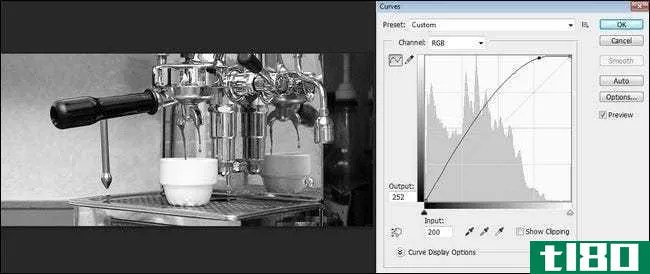
We couldn’t drop it all the way down because that would turn the picture almost completely black. Instead, we dropped it significantly below the starting line (the light gray line indicating the original baseline curve). You can see how it significantly darkens the photo and turns what was a bright coffee shop photo into something moodier. Clearly, the end result is a bit on the underexposed side, but we wanted you to see how dramatically a fairly **all adjustment in the curve could change things.
Now that we’ve played with a single point on the curve and seen how it affects everything, let’s reset the curve. Hold down the ALT key and the “Cancel” button in the Curves box will turn into “Reset”. Click to reset the curve back to the state it was in when you opened the menu.
Let’s see what happens when we add more points to the curve. Go ahead and repeat the process we performed above to select one the lightest points in your photo (like our espresso cup) and then pick darkest point using the same technique. You’ll end up with a dot for the light and a dot for the dark on your curve.
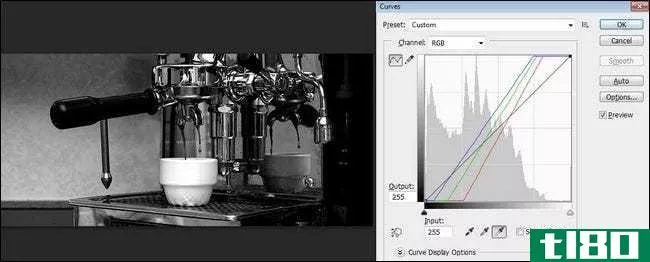
This is where things get fun. We’ve just made an anchor point for the darkest and lightest parts of our image, Let’s get a little crazy with everything in between. Use the dropper tool to pick any portion of the image you’d like to adjust (or, since we’re being playful, just grab any point on the line) and make an adjustment. If you like it, leave it. If you don’t like it, slide it back into place. Feel free to tug and pull the curve as you see fit to create the image you’re looking for. After a moment or two of playing this is what we came up with:
You can see how, in playing with the curves, it’s possible to capture elements of our earlier two example images. We liked the brightness of the cup but we also liked rich moody shadows. A little fiddling with the curves let us bottom out some of the shadows, spike the intensity of the highlights, and enjoy the best of both.
Now that we’ve looked at manual curve adjustments, let’s look at the Curve presets.
Quick Manipulati*** with Preset Curves
We recommend manually playing with the Curves tool for a while until you get a real sense of how changing the curve changes your images. Once you’ve done that, however, you’ll likely find it invaluable to call on the Curve tool presets.
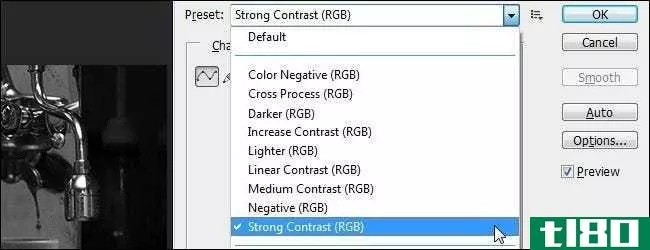
For example, in the last image of the previous section of the tutorial, we arrived at a pretty high-contrast image. The whites and highlights were fairly bright and the shadows were quite rich. Since we’ve established that we like high contrast images, the next time we go to use the Curves tool, we can pre-seed our image curve by selecting “Strong Contrast”. Let’s look at the curve it gives us for that preset:
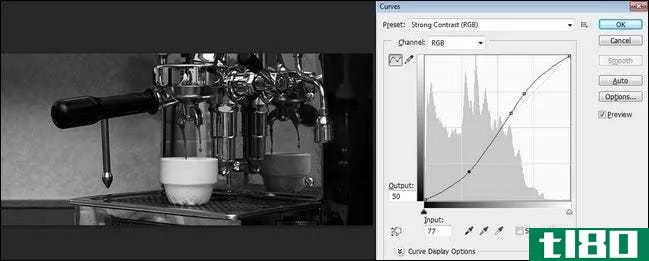
The preset is essentially the curve we had in our prior image (except a bit **oother as it doesn’t have the extra pull on the highlights and lowlights that we put in). You can see how using the presents to jump in the direction you want to go and then finishing the job by making subtle changes to the existing curve is a much faster way to achieve the results you want than reinventing the wheel.
Playing with Black, Gray, and White Points
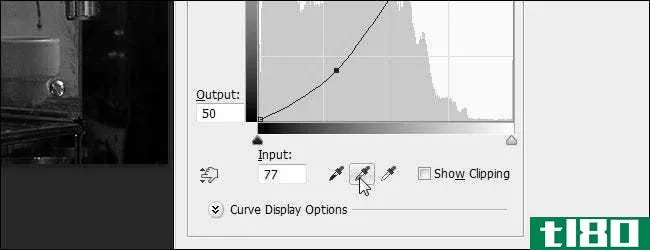
If you were worried that we had run out of fun tricks in the Curves menu, well, worry no more. We have another handy little trick to help you manipulate the curves and further enhance your black and white images. There’s a big part of the Curves menu pane we haven’t even talked about yet, and that’s the black, gray, and white adjustment droppers at the bottom of the pane.
Our work with black and white images makes these tools even more relevant. When we want to create high contrast images and really capture the crispness common in old black and white photos, it’s so easy to do so with a quick manipulation of the black, gray, and white points. Click on each one and select the darkest point in the image, a mid-tone gray point, and the whitest point in the image:
From here you can manipulate the curve and apply presets just like you did in the previous two steps of the tutorial.
Although many people are put off by the complexity of the Curves tool, we hope after a little tinkering you have seen how the extra effort is worth the time and yields really fantastic images.
Have a tip or trick to make convert photos to black and white and make them pop? Join in the conversation below.
- 发表于 2021-04-11 20:37
- 阅读 ( 355 )
- 分类:互联网
你可能感兴趣的文章
如何使用新的macos照片编辑和组织图像
... 在屏幕顶部,您将看到三个不同的按钮:调整、过滤器和裁剪。我们从作物开始。 ...
用photoshop模拟数码照片的胶片质量
...尽可能少的时间来获得你所选择的确切颜色质量。我们将调整以下图像,使用尼康D3200数码单反相机拍摄。 ...

如何用photoshop脚本自动化photoshop
Photoshop是一个很好的编辑图像的工具——我们是这里的超级粉丝,这已经不是什么秘密了。我们之前已经介绍了如何设计一个简单的logo,以及如何修复过度曝光的照片,所以一旦掌握了基本知识,自动化是下一个合乎逻辑的步...

如何用photoshop技巧快速改变图像的颜色
把Photoshop想象成烹饪食谱,它会变得更简单。 ...
如何使用adobe photoshop制作鬼鬼祟祟的老式万圣节照片
... 添加一个黑白调整层到图像和调整滑块,直到你有一个转换你喜欢。我们将在下一步处理对比度,所以不要在这上面花费太多时间。 ...
3无滤镜拍摄更好照片的摄影基础
... 学会使用曲线 ...
如何快速为黑白照片添加颜色
... 无论哪种情况,第一步都是使用曲线层来调整亮度和对比度,使图像相对平坦和中性。 ...
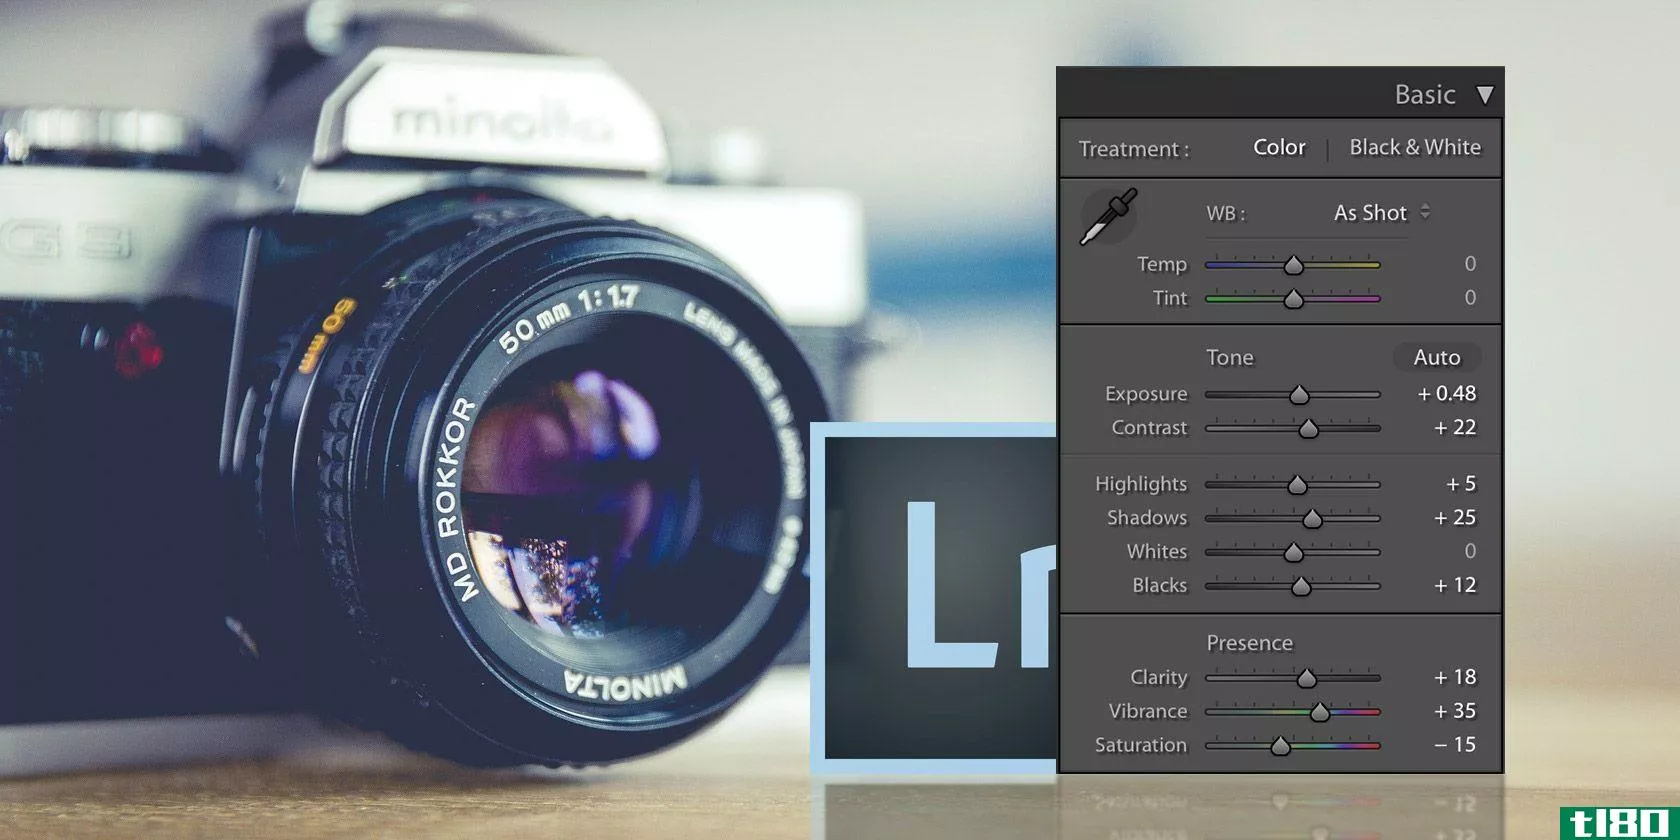
如何使用adobe lightroom创建复古照片效果
...古照片兴起的失败也提出了同样的观点。在数字时代,任何用比特和字节**的东西都是丰富的。任何具有物质性的东西都变得越来越少,因此也变得很有价值。但是那些生存下来的物理事物(比如电影照片)常常是有原因的。因...

android最佳照片编辑应用
...过滤器的人会觉得这个应用有点吓人。但是,如果你熟悉调整色调曲线水平,亮度和其他微妙的功能-这可能是完美的照片编辑应用程序为您。 ...
如何在photoshop中创建自定义sepia效果
... 单击Photoshop屏幕右下角的“创建新填充或调整层”图标。选择黑色和白色。 再次单击“创建新填充或调整图层”图标。这次,选择“颜色查找”。 在“颜色查找”菜单中,找到第一个...
0 篇文章